Space

Before you can start using the app, please create a new account with your email address and think of a password. This is the only way the app can assign your entries to your account. In the free version this is free of charge, but you can create a maximum of 5 entries per area. If you like the app and want to use it to the full extent, you can subscribe to it and create and synchronize as many entries as you like. For details see here.

User interface

Menue obenThe menu bar (diary) on the smartphone

Menue obenThe menu bar (diary) on the tablet


There are 6 areas that are at your disposal: diary, to-dos, beds, varieties, genera and sources.

Each area has a symbol and its own colour to make orientation easier. At the top of the screen you can switch between the areas (on your smartphone by touching the 6 dots) and then you will get to the list view. In each area the corresponding button at the top also has a submenu (folds out when touched or clicked).

To the right of the 6 icons (on the Smartphone there are 6 dots) there are icons to add an entry, clone the current entry (not everywhere, because it doesn't always make sense), delete an entry and for searching.

In each area there is a list view (the most important data, standard) and a detailed view (with all information), which you can get to by clicking on the right arrow in the line of the corresponding entry. The arrow always has the colour of the area you are currently in.

In the list view, the current (selected) entry is highlighted in yellow. To select an entry, click somewhere in the line where there is no text field. You only need to do this if you want to delete or duplicate an entry in the list. The arrow to the detail view always leads to the corresponding entry, no matter which entry is selected.

All sections use the same data, in the diary for example you can choose from all the genera and varieties already created. More details in the respective sections.

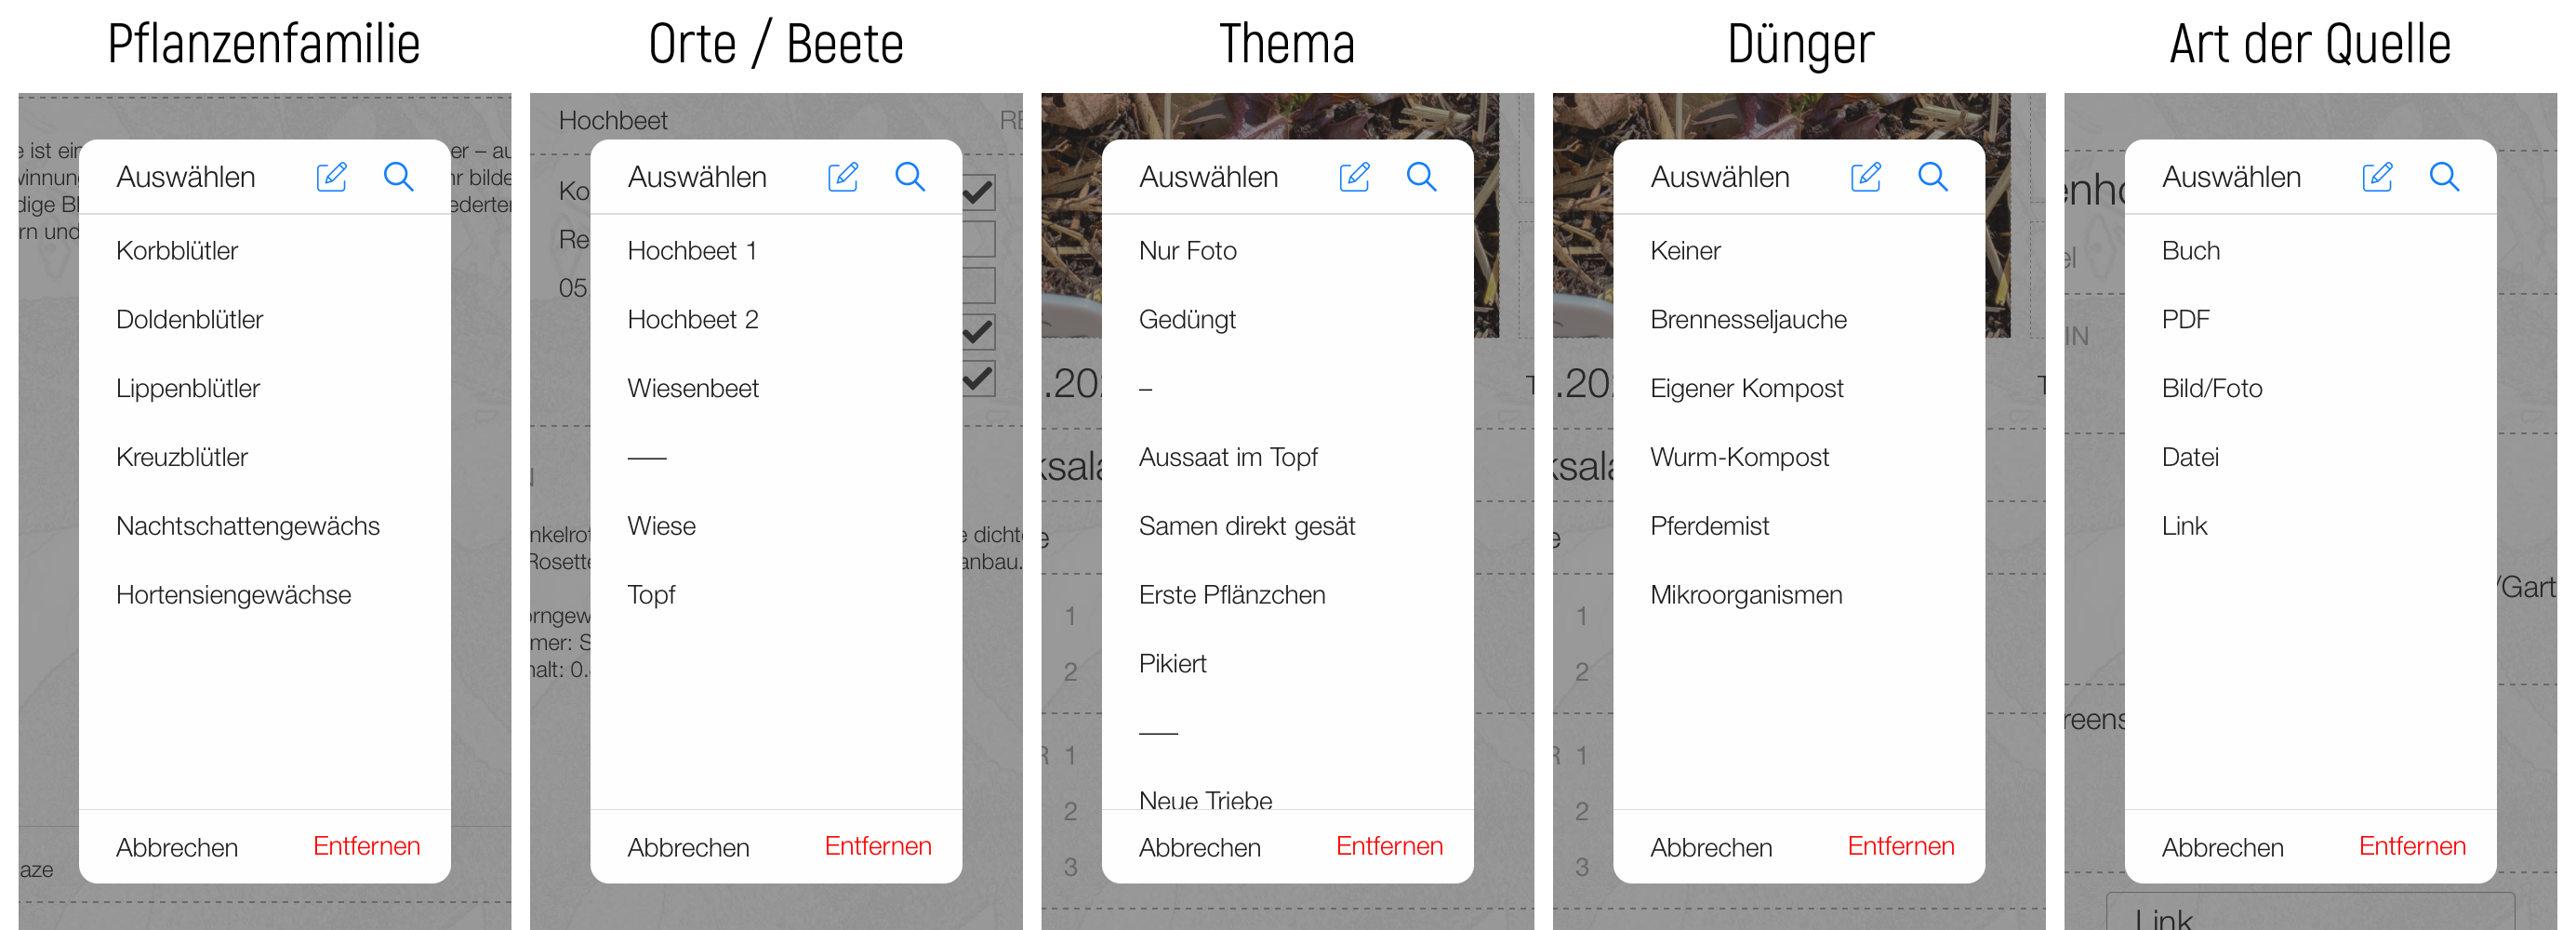
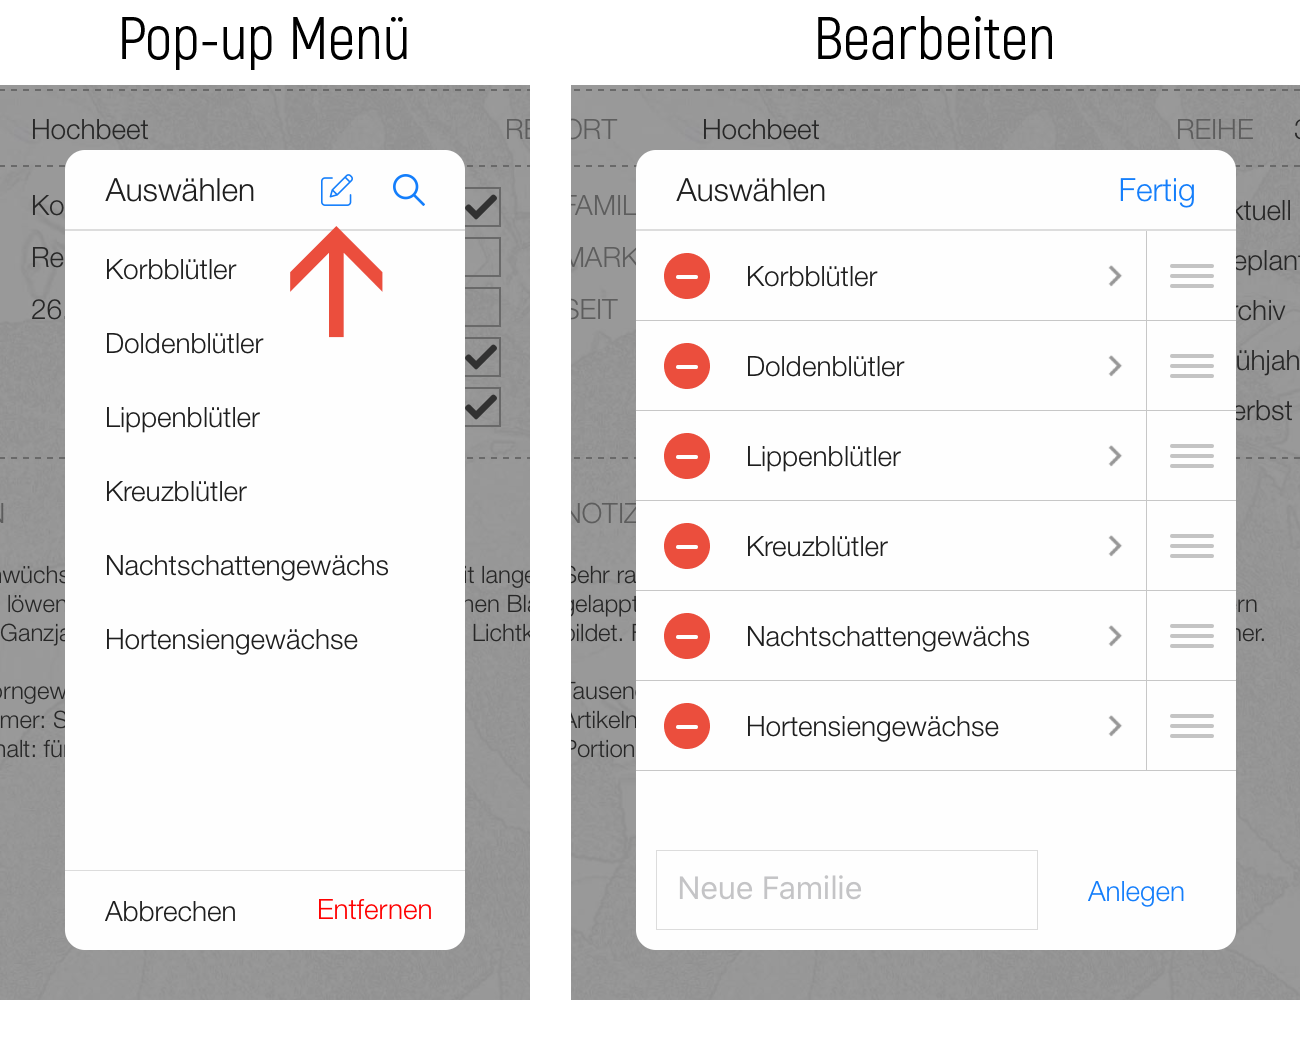
In some input fields pop-up windows appear with a list of terms you (probably) use often. For example, for fertiliser in the diary or for to-dos. You can adapt these terms to your needs, you can read about how to do this here.

For general understanding, the following

CONTENTS

To make it as easy as possible for you to get started with the app, there are sample entries in each area so that you can try out how it works right away. You are welcome to continue using these entries, but you can also add, change or delete them! However, the app does not contain any further information about all kinds of vegetables or plants!

TEXT FIELDS

To accommodate as much information as possible at a glance, the text fields and the texts in them are relatively small. For this reason, a pop-up window opens when you enter text, making the text larger and easier to read. This can of course also be used just to read the details.

PORTRAIT AND LANDSCAPE

The screen layout on the tablet is optimised for landscape format, but also works in portrait format.
The screen layout on the smartphone is optimised for portrait format, landscape format is NOT intended - except for the bed management.


Write comment (0 Comments)

Step 1:

Create your account as "New user" with e-mail address and password and click on "Login".

Step 2:

You are now on the start page of the app and under the bioGartler logo you see the 6 symbols for 6 different areas.

Step 3:

By touching these icons you can access the different areas and start exploring the app.

If you have loaded the app, there are already premade entries for 3 genera and 4 varieties as samples. Of course you can continue to use them, change or add to them but of course you can also delete them. If you do not want to use any of the genera, diary entries, to-dos or sources, delete them. If you do not want to use the entries for the varieties for the time being, go to the detail view and select "ARCHIVE". It will then only appear in the list when you search for it.

Suppose you bought seeds for Chinese Cabbage, the variety is called "Atsuko"

1st Create the genus

Go to the Genus area (blue) and create a new genus with the plus icon above and enter "Chinese cabbage" in the Genus field. If you already have information about it, you can enter it right away, but you do not have to.  [ MEHR LESEN ]

2nd Create the variety

Now go to the Varieties section (green), create a new entry with the plus icon at the top and select "Chinese Cabbage" in the Genus field in the pop-up window. At this moment all the information you have entered in the genus section will appear. Then enter the name "Atsuko" in the field Variety.  [ MEHR LESEN ]

3rd Enter To-do

Now you could already go to the To-dos (brown) section, create a new entry and enter when you want to sow your Chinese cabbage. If you click here on Genus you can choose your Chinese cabbage in the pop-up window and for the variety the "Atsuko".  [ MEHR LESEN ]

4th Create a bed

Go to the flowerbeds (light brown) section, create a flowerbed (click the plus button once per row and on the left create / name the flowerbed and enter the year, see here) and consider in which row of your flowerbed you want to sow the Chinese cabbage. [ MEHR LESEN ]

5th Specify source(s)

Do you have a vegetable book that describes the cultivation of Chinese cabbage? Go straight to the sources (grey), enter the title and select your Chinese cabbage in the detailed view below the picture under "Genera included" and indicate on which page in the book it can be found. You can add all other data and the picture of the cover at any time later. [ MEHR LESEN ]

6th Keep a diary

When the time has come and you have sown your Chinese cabbage, create a new entry with Chinese cabbage and Atsuko in the diary (orange), select the topic "Seeds directly sown" and save a photo.  [ MEHR LESEN ]


Over the years, you will build up your own personal database of your garden and vegetable beds in this way. Available at any time, because you always have it with you on your smartphone!


Write comment (0 Comments)

Because you can freely name both genera and the corresponding varieties, there are many possibilities to manage your vegetables, flowers, trees, but also for example beds, beneficial insects, pests and other things in the garden, to collect information about them and to document everything in a diary.

You could think of "group" instead of genus, the varieties are then all that belongs to this group. But these do not necessarily have to be plants (see below).

Here are a few examples, first as you already know it:

Genus    Tomatoes
Varieties   Green Zebra, Moneymaker, Black Plum, Donatellina, San Marzano

So far, so clear. But you also have different apple trees:

Genus    Apple trees
Varieties    Boskop, Elstar, Braeburn, Jonagold

You have different fruit trees, 2 varieties of apple trees, otherwise only 1 variety each:

Genus    Fruit trees
Varieties    Apple Elstar, Apple Braeburn, Plum, Apricot, Cherry

Here are a few suggestions on how it also works:

Genus    Meadow
Varieties    In front of the house, Behind the house
Genus    Roses
Varieties    Gift from Jim, Yellow Clementine, Elfe®
Genus    Weeds
Varieties    Dandelion, Chickweed, Commelina, Speedwell

You do not know the variety of your plant?

You can also create and use a genus without an associated variety, for example if you don't know the variety at all. But keep in mind: you might get a second variety of this genus at some point, whose name you know and want to enter. Then you would have 1 genus with 2 varieties, one of which has no name. So for variety better "unknown", "n.a." (for "no idea" or "no information"), the year since when you have it or something similar. Or just add all entries for this variety later ;)

If you want to buy seeds (or young plants) of a variety a second time and document them separately, just add the year to the variety. For example, if you already had the strawberries of the variety "Polka", buy new plants and name the variety "Polka 2020".

But a genus and its varieties do not have to be plants ...

Genus    Beneficial insects
Varieties    Bees, Ladybirds, Lacewing, Earthworms
Genus    Parasites
Varieties    Snails, Lice, Potato Beetles, Spider Mites
Genus    Pond
Varieties    General (concerning the pond), Grasses, Water, Fish species 1, Fish species 2

You can also document your beds ...

When did you plant the bed? When did you fertilise or mulch? When did you sow which green manure? You can simply write all this down in your diary.

Genus    Beds
Varieties    Raised bed 1, Foil tunnel, Greenhouse, Shrub bed 1, In front of the house, ...

So with this app you can easily collect information on any topic, find it again easily at any time and document everything in your diary! As you can see, there are countless ways to use the app.


Translated from German with DeepL.com (free version)


Write comment (0 Comments)

There are pop-up windows in many places that show you a list of terms. In the diary, for example, if you click on the input field for "genus", the list will show all the genus you have already created. Once you have selected the genus and clicked on "variety", all varieties that you have already assigned to this genus will appear. These lists are automatically created with the terms you created under "Genus" and "Variety".

In the detailed view of genus and varieties there is a pop-up under fertiliser, i.e. "starch". There you can choose weak eaters, middle eaters or strong eaters.

But there are also lists that you can design yourself directly in the pop-up window.

With certain input fields you use the same terms over and over again. For example, the plant family, the to-dos or the fertilizer. To avoid having to type the same words over and over again, a pop-up window opens with a list of previously created terms. You can enter them by touching the corresponding field. These are

  • for genus around the plant family
  • for varieties around the places (or beds, same contents as the beds)
  • in the diary about the topic and the fertilizer (fertilizer itself content as in the to-dos)
  • in the beds around the bed (same contents as the varieties)
  • for to-do's, the to-do and the fertilizer (fertilizer itself content as in the diary)
  • for source, by the type of source

5Pop ups


Editing these lists

In the download version of the app some terms are already created in each of these lists. Of course you can change, delete or add these terms at any time. But you can also change the order, for example by placing the most common terms on top.

Proceed as follows

Pop ups bearbeiten

  • You tap on the corresponding field, the pop-up window opens
  • At the top there are two blue icons, the first one for editing the list, the second one for term search
  • You tap on the first symbol (with the small pencil), now you can edit this list.
  • Tap on the red circle on the left to remove the term
  • By clicking on the arrow on the right: change the name of the term.
  • ATTENTION: If you change the name of an already used term, you have to reassign the changed term wherever it already occurs!
  • Below to create new terms
  • By touching and holding a term, you can move it to any position.


Tip

You can also divide the terms into groups by creating a field (or several) as a separation, for example "---", and move it to the right place. If you create several such separators, they should be different, e.g. 3 strokes "---", 4 strokes "----", 5 strokes "-----" etc.


Write comment (0 Comments)

In many places in the app you have the possibility to insert photos or images, either directly from the camera or by selecting them in the photo library.

The size of the photos from a 12MP camera is 3024 x 4032 pixels and can take up to 3 MB of memory. The trend with smartphones is towards even higher resolution. If you use the app for a few years, this would use up quite a lot of memory on your device and on the sync server. That's why the size of the photos is automatically reduced both when you take photos and when you import them.

IMPORTANT

For both camera- and library-imported photos/images, the image size is reduced to a maximum of 1,500 pixels (for the longer side of the image) in order to reduce the amount of data for storage on your device and for synchronisation.

ATTENTION: The photos taken within the app are NOT automatically saved in the photo album of the device!

So if you should ever need pictures of your plants in the app - for example for a blog entry - you can search for the required entries in the diary and then export the required photos. This size is quite sufficient for this, in fact it's perfect.

TIP

If high resolution of your photos is important to you, you shouldn't take them using the camera function of the app, but first take a photo and then import it into the app. And don't forget to make a backup of your original photos ;)


Write comment (0 Comments)

Icon Tagebuch

Tagebuch

Dokumentiere alle Pflanzen und Bereiche in deinem Garten. Mit bis zu 4 Fotos pro Eintrag.

LESEN

Icon Tagebuch

Gattung

Sammle alle Informationen über Gattungen, die du gepflanzt hast und/oder DICH interessieren.

LESEN

Icon Tagebuch

To-dos

Trage dir hier ein, was du als Nächstes erledigen willst. Um keinen wichtigen Termin zu verpassen.

LESEN

Icon Tagebuch

Sorten

Sammle alle Informationen zu den unterschiedlichen Sorten, die du zu einer Gattung hast.

LESEN

Icon Tagebuch

Beete

Plane und verwalte deine (Gemüse)Beete oder ganze Bereiche im Garten. Auch für's nächste Jahr.

LESEN

Icon Tagebuch

Quellen

Verwalte deine Quellen (z.B. Bücher, PDFs), und ordne sie einer oder mehreren Gattungen zu.

LESEN

Das alles in 1 App + Sync zwischen deinen Geräten!


Alle diese Tools sind miteinander verknüpft, Gattungen und zugehörige Sorten, die du angelegt hast, stehen in allen anderen Bereichen automatisch zur Auswahl. Egal, ob Mobile, Tablet, iOS oder Android, alle Einträge werden zwischen deinen Geräten synchronisiert!

Mobile Tablet

Hol dir die
Logo bioGartler App H230für iOS oder Android

Logo AppStore Logo PlayStore